
By Kirk Hayes | Senior Security Consultant at LRQA Nettitude
Docker is a platform that provides you with the capability to create containers which can link any type of software, including binaries or libraries. In the following post, we’ve sat down with LRQA Nettitude’s Kirk Hayes; Senior Security Consult in the US, to pick his brains on his experience using Docker as he gives us an insight into what Docker is and how it can be used in your Pen Testing engagements.
What is Docker?
Docker is a platform that provides you with the capability to create containers which can link any type of software, including binaries or libraries. Through this technology, you can deploy a testing environment with separately stored data without all the additional overhead required by the deployment of multiple VMs. Multiple containers can use the same image and even be run at the same time allowing for reduced processing requirements and data segregation. A Docker container can be an entire operating system or a specific application. Docker is interacted with through the use of a Docker client and can be run on Windows, Mac, or Linux. The container can be interacted with at a command line level or run as a daemon and connected to through other means such as a web browser.
There are many guides on installing Docker but for this blog, I am making the assumption you have Docker installed already. If not, go to https://docs.docker.com/get-docker/ and follow the installation for your distribution. Some useful commands to use through the client are:
- docker ps (list running containers)
- docker images (list images)
- docker run (run docker container)
- docker pull (retrieve a docker image from the docker hub or another registry)
- docker kill (kill one or more running containers)
- docker rm (remove one or more containers)
- docker rmi (remove one or more images)
What is your opinion on Docker as an effective tool?
Docker is an excellent tool that can fulfil several penetration testing requirements. Over the years I have continued to evolve my security testing process. I have tried using a single Virtual Machine (VM) for testing, which became unruly trying to keep customer data separate as different applications store data in different places. I moved to a fresh VM for each engagement, which worked well until I kept running out of space on my hard drive due to the size of operating systems and software installations. I needed a solution to make my workflow simpler, more secure, and would permit the segmentation of data between different testing engagements. That is where Docker comes into play, but before we get to how Docker has redefined my testing processes, let’s take a look into what Docker is and how to use it.
How do you use Docker in your engagements?
One of my favourite ways to use Docker containers is to test software. As penetration testers, you may find that you need to install a piece of software to test an exploit or you might want to install software to write up a discovered vulnerability to disclose to a vendor. Installing an operating system in a VM, then installing the software, and configuring that software and operating system can take a lot of time, and often, time is not on our side. Being able to setup the software in an isolated environment, test, and then kill associated processes, using minimal resources, is where Docker improves my workflow.
An example of this aforementioned workflow improvement through my use of Splunk. Splunk is an application for searching, monitoring, and analyzing machine-generated data through a web interface. Splunk is often used by security teams for monitoring event logs, and as a penetration tester, can be useful to see what type of events are generated by particular activities. To install Splunk, you would need to follow a process that could take a few hours to complete. If I were to be using it in a production environment, that time would be well spent; however, in a test environment, it is not. Instead, I can use Docker to deploy a Splunk instance within a matter of about 3 minutes. Splunk has deployed an image to the Docker Hub and you can retrieve that image by simply using:
docker pull splunk/splunk
Once the image is downloaded; you can then run the image using:
docker run -d -p 127.0.0.1:8000:8000 -e "SPLUNK_START_ARGS=--accept-license" -e "SPLUNK_PASSWORD=<password>" --name splunk splunk/splunk:latest
This command will run the Splunk image in a container named “Splunk”, as a daemon, exposing port 8000 to the localhost only which maps to port 8000 in the container, and passing in a few arguments to accept the license and setting the admin password. Once run, you can navigate to http://127.0.0.1:8000 using any browser on the machine you are running Docker on and access the Splunk console using the password you designated in the command.
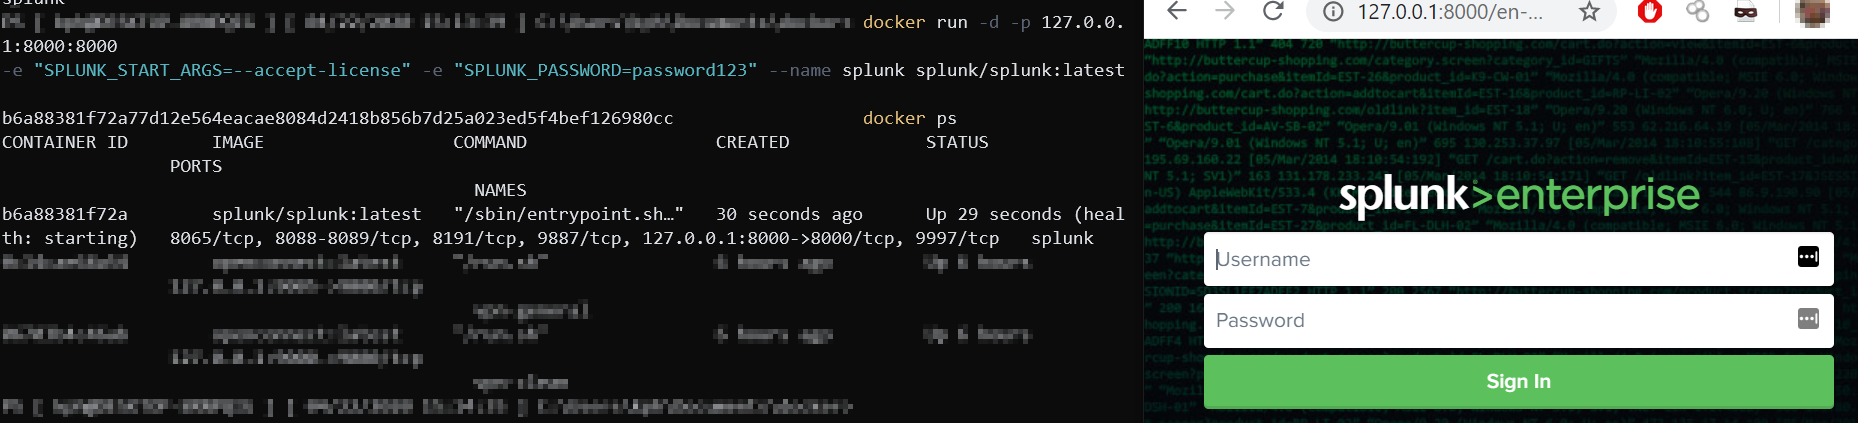
Now you can test the Splunk software without the need for a complicated setup.
How do you build Docker images?
While this is useful to be able to run already created images, you may want to build your own images. It is also useful to know how Docker images are built so you can read other projects’ Docker build files to know exactly what is being done before running on your own host.
To build a Docker image, we need to build a Dockerfile. The Dockerfile is the file that holds all the instructions for building the image. The first part of the Dockerfile will contain a FROM instruction. The FROM instruction specifies the parent image we want to build off of. For example, if we want to build from an Ubuntu 16.04 image, we can specify:
FROM ubuntu:xenial
(Xenial is the codename for 16.04.)
We then begin passing in an instruction and arguments. Some common instructions are:
- RUN (Run a command
- CMD (Set defaults for running a container)
- COPY (Copy file/files to a specified location in the image during build)
- ENTRYPOINT (Create container to run as an executable)
There are many more instructions that can be used in a Dockerfile, and I would suggest visiting https://docs.docker.com/engine/reference/builder/ to find out more.
With that explanation, let’s build a basic Ubuntu Docker image.
- Create a file called dockerfile
- Edit the dockerfile to contain:
FROM ubuntu:xenial
RUN echo hello > /root/hello.txt
CMD /bin/bash
Once your Dockerfile is created, you can build your image using:
docker build -t <tag_name> .
Now run your new image by using:
docker run -it <tag_name>
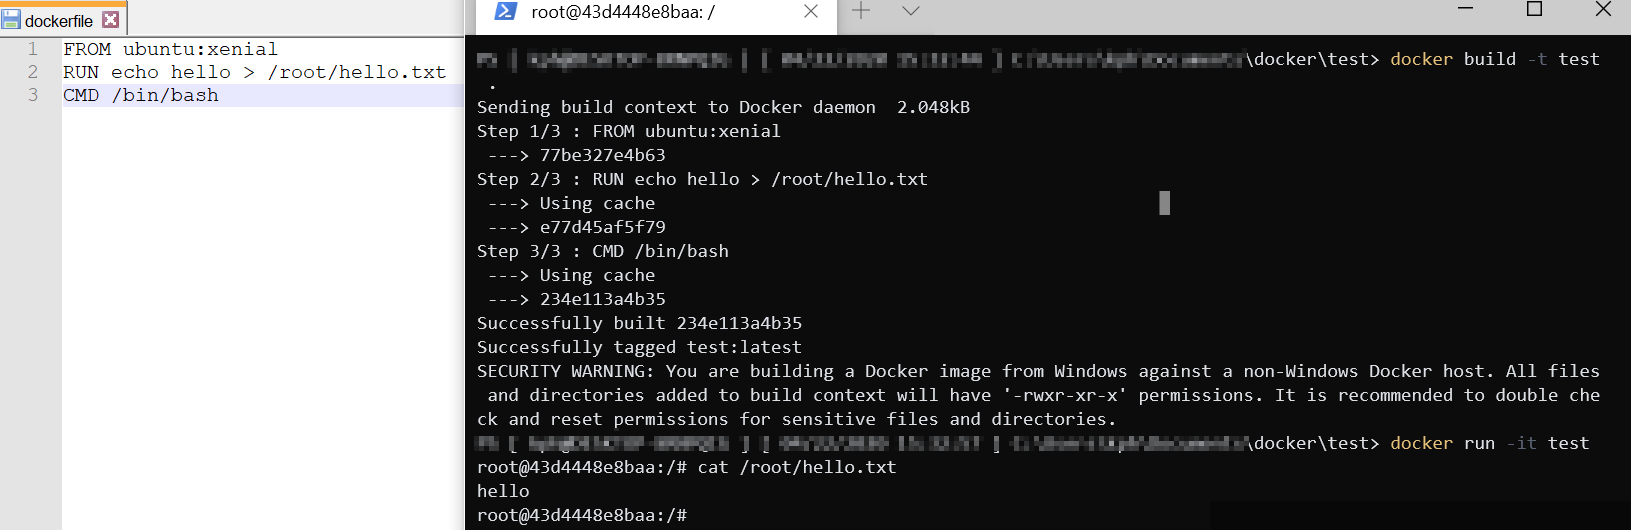
As shown in the above screenshot, using the steps in the Dockerfile, a new image was built and then a container was run based on the created image.
Another example of a Dockerfile built for running PoshC2 can be found here: https://github.com/nettitude/PoshC2/blob/master/Dockerfile
It is important to realize that you can deploy more than just software with Docker. As shown in the previous example, you can deploy older versions of operating systems, such as Ubuntu 16.04. This allows you to easily and quickly deploy older operating systems to test exploits against as well!
What are some practical uses for Docker?
This leads me back to the start of the article. I kept looking for ways to refine my process for testing. How about using Docker for some of the following?
- VPN connection to testing jump boxes
- BloodHound Neo4J Server
- PoshC2
- CrackMapExec, Metasploit, Impacket Suite, etc
- A Self-contained Penetration Testing Standard Operating Environment (SOE)
Many of the most popular penetration testing projects have pre-existing Docker files available, and if not, it is very easy to create your own!
I have found that using Docker for many of these purposes allows for a simpler setup and a cleaner penetration testing environment. It has allowed me to quickly test software and operating systems and it has reduced the processing requirements on my system. Is Docker right for your workflow? Only one way to find out. Deploy a few containers and see how it can revolutionize your workflow
To kick-start the learning, a great resource for testing applications in Docker can be found here: https://github.com/AvasDream/pentesting-dockerfiles
Need more help with your Pen Testing engagements? Get in touch with your local team to find out how we can help.
*This blog post is part of an insight series with one of our experts and does not represent the overall thoughts, opinions or methods used by Nettitude in our engagements.


